In this article, you will learn how to configure the Surfshark Open VPN tunnel on your OpenWRT router through the router's web interface.
Note: if you would prefer to set it up via the terminal instead, please check out our guide on how to set up OpenVPN on an OpenWRT router.
Credentials and server selection
Before setting up the router, you will need to obtain the credentials for the manual setup and select a server to connect to.
NOTE: These are not your regular credentials, such as your email and password.
- Head to the Surfshark login page and log in. Then, click on VPN -> manual setup.
-
Select set up manually.
-
Choose the OpenVPN protocol.
-
Once there, make sure that you are in the Credentials tab and click on Generate credentials.
NOTE: Keep this tab open or save the credentials, as we'll need them later.
Choose a Surfshark VPN server
-
Head to the Locations tab and locate the server that you wish to connect to.
-
Click on the download icon to the right of the server name.
-
Click on download UDP.
NOTE: In this example, we will be using UDP, however, feel free to use TCP. You can check out the differences here.
Configuring the OpenVPN client
- Firstly, enter your OpenWRT router's web interface by entering its local OP address into your internet browser's URL bar. By default, the IP address is 192.168.1.1. The username is root.
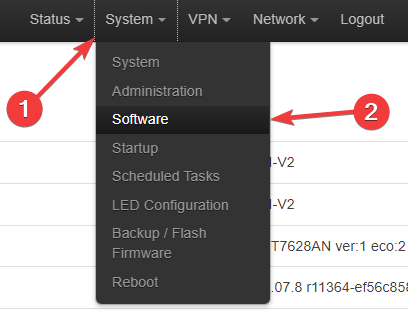
If it is your first time set up, no password is set. You can set it up by clicking on System > Administration. - Once you log in, select System and then click on Software.
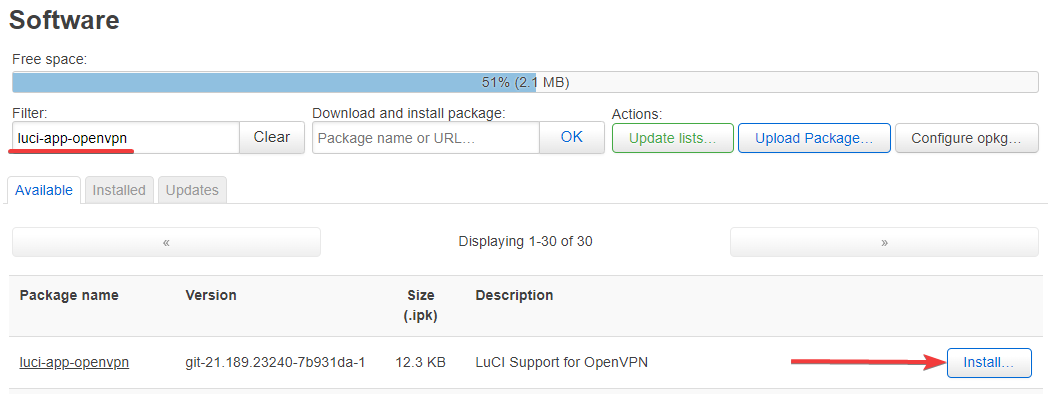
- Next, click on Update lists, and then wait for the process to finish. Once it does, click Dismiss.
Now, you will see a list of all the packages you have installed in your OpenWRT router.
We will have to install the following packages by typing in their name in the Filter field and then clicking Install... - Click Save & Apply and refresh the router page. A new tab, called VPN, should be visible now. Click on it and choose OpenVPN from the dropdown menu.
Under the OVPN configuration file upload section, name the VPN connection in the Instance name field. You can name it whatever you like. In our case, we named it surfshark_uk_lon. Next, click on the Browse button and select the downloaded server file by pressing Upload. - In the OpenVPN instances tab, click the Edit button next to the connection instance you have just created.
- In the field lower below, enter your credentials from the first step.
- Now, you need to copy the path to the credentials file that is given by writing it next to the auth-user-pass line in the Config file.
- Click the Save button once done.
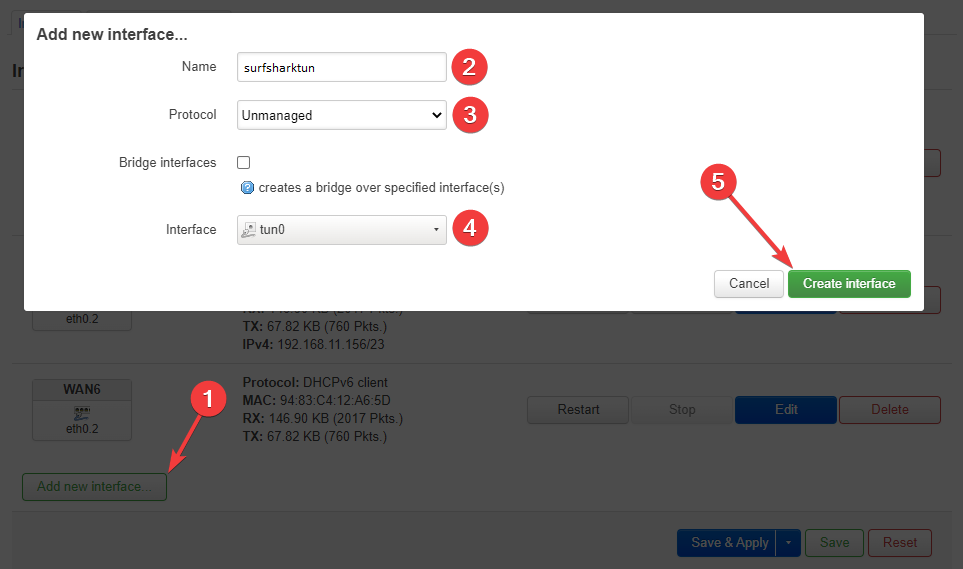
- Now, click the Network tab at the top of the page, choose Interfaces, and select Add new interface... Name it "surfsharktun".
- Click on the Protocol dropdown menu and select Unmanaged.
- In the Interface drop-down, enter the name tun0 at the bottom -- custom -- field and press the Enter key.
- Now, click the Create interface and Save buttons. After, choose the Network tab at the top again, and head to the Firewall section. When there, click the Add button and adjust it like so:
1) Name it vpnfirewall;
2) Set the Input option as Reject;
3) Leave Output as Accept and Forward as Reject;
4) Check the Masquerading option;
5) Check the MSS clamping option;
6) From the Covered Networks drop-down menu, choose surfsharktun;
7) In the Allow forward from source zones drop-down menu, choose lan;
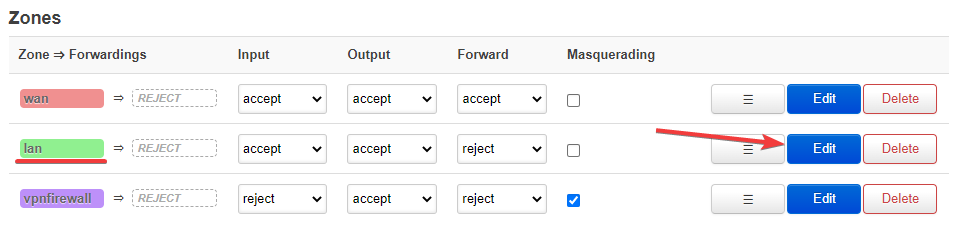
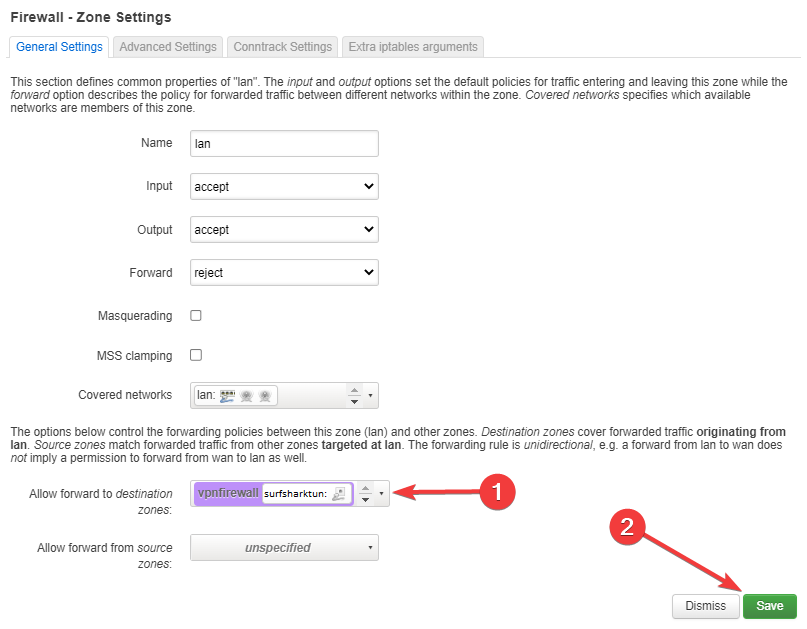
8) Click the Save button. - In the Zones section, find the zone named lan and click on the Edit button.
- In the Allow forward to destination zones drop-down menu, check the surfsharktun entry and make sure to click Save after.
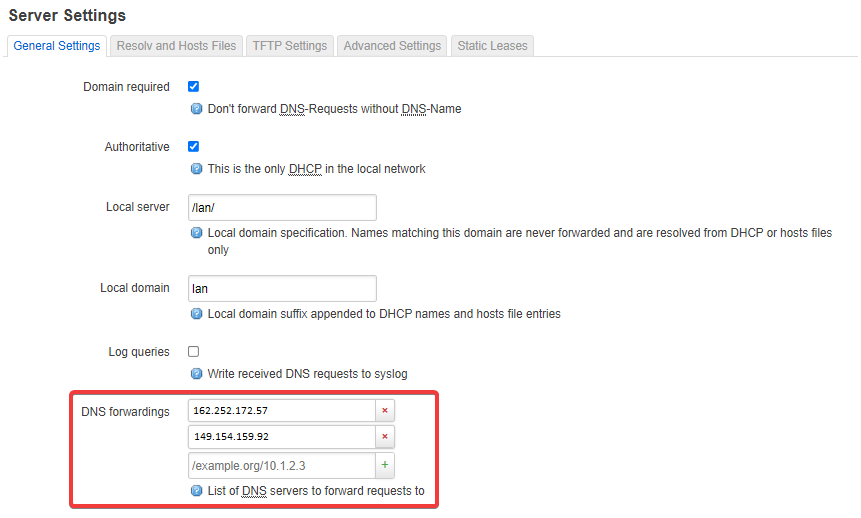
- Click on the Network tab at the top of the page again and select DHCP and DNS.
- In the General Settings tab, find the DNS forwarding option and enter Surfshark DNS addresses there. The addresses are 162.252.172.57 and 149.154.159.92
- Now go to the Resolv and Hosts Files tab, check the Ignore resolve file checkbox, and click the Save & Apply button.
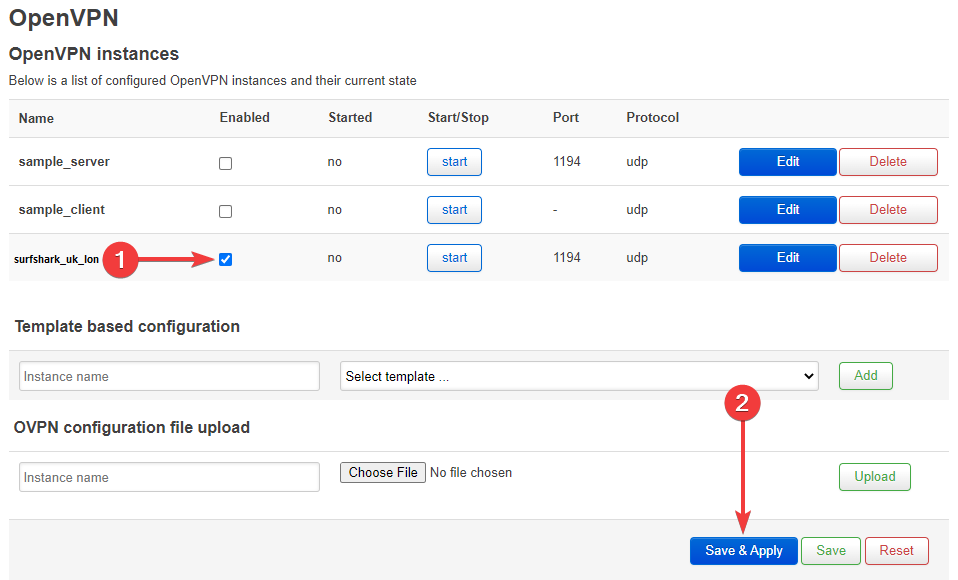
- Lastly, head back to the VPN tab and select OpenVPN. In the OpenVPN instances section, check the Enable option next to the Surfshark option in the list. Then, click on the Save & Apply button.
- Now, all you have to do is press Start next to the Surfshark instance, and you'll be connected. Once you wish to disconnect, press Stop.


Make sure your connection is successful
It's always recommended to check whether your connection was successful after setting up a VPN for the first time. This can be easily done by doing an IP leak test and a DNS leak test, which is available on our website.
You may also be interested in: